Kubernetes - Azure Container Service (AKS)

This document covers deploying Smilr into Kubernetes and specifically into Azure Container Service (AKS) This assumes you have the latest Azure CLI installed (2.0.21+)
Set-up & Creation of AKS
This document is not intended to be a step by step guide for deploying Azure Container Service (AKS), if you do not have AKS setup then there are several guides you can use
- Azure Citadel - Kubernetes: Hands On With Microservices
- Azure Docs - Quickstart: Deploy an Azure Container Service (AKS) cluster
NOTE. When creating your AKS cluster it is strongly recommended you enable the “HTTP Application Routing add-on” during creation, or create with the
--enable-addons http_application_routingoption. This will automatically enable an ingress controller in your cluster and also provide you with an external DNS zone in Azure, with Kubernetes configured to automatically create records in it.
Deploying Smilr to Kubernetes
Once you have AKS deployed and are able to interact with it via kubectl you can start deploying Smilr to it
Pre-requisites
Before starting deploying Smilr into Kubernetes you will need to have an Azure Container Registry (ACR) populated with the Smilr container images.
Refer to the main container guide for details
 Complete container guide
Notes on Smilr Kubernetes deployment:
- There are numerous places where the configurations refer to a container registry and image. Unfortunately these are not all parameterizable, so you will need to edit files to point to your own registry (ACR)
- When deploying to Kubernetes use of the
defaultnamespace is assumed. - Kubernetes version 1.9+ is assumed, if you are using 1.8 or older the API version in the deployment YAML may require changing e.g. to
apiVersion: apps/v1beta1. Older versions have not been tested.
Option 1 - Helm (Easiest)
Helm is a package manager for Kubernetes, and a Helm Chart has been created to deploy Smilr. This means you can deploy Smilr with a single command. The chart is called simply ‘smilr’ and is in the helm subdirectory
Helm & Smilr Quick Start
- Install Helm https://docs.helm.sh/using_helm/#installing-helm
- Add Helm to your Kubernetes cluster:
helm init - From root of this project
cd kubernetes/helm helm install smilr- Done!
Full details of using the Helm chart are here:
Helm Chart Docs
Option 2 - Direct Deployment
Deployment YAML files have been provided to directly stand up Smilr in your Kubernetes cluster. Two scenarios are provided, in both cases the deployment has been split into multiple files.
Before deployment of either scenario the files frontend.yaml and data-api.yaml will require editing to point to your images and the relevant registry (i.e. ACR) & tag you are using. It is assumed you will be deploying to the default namespace
Scenario A - Basic
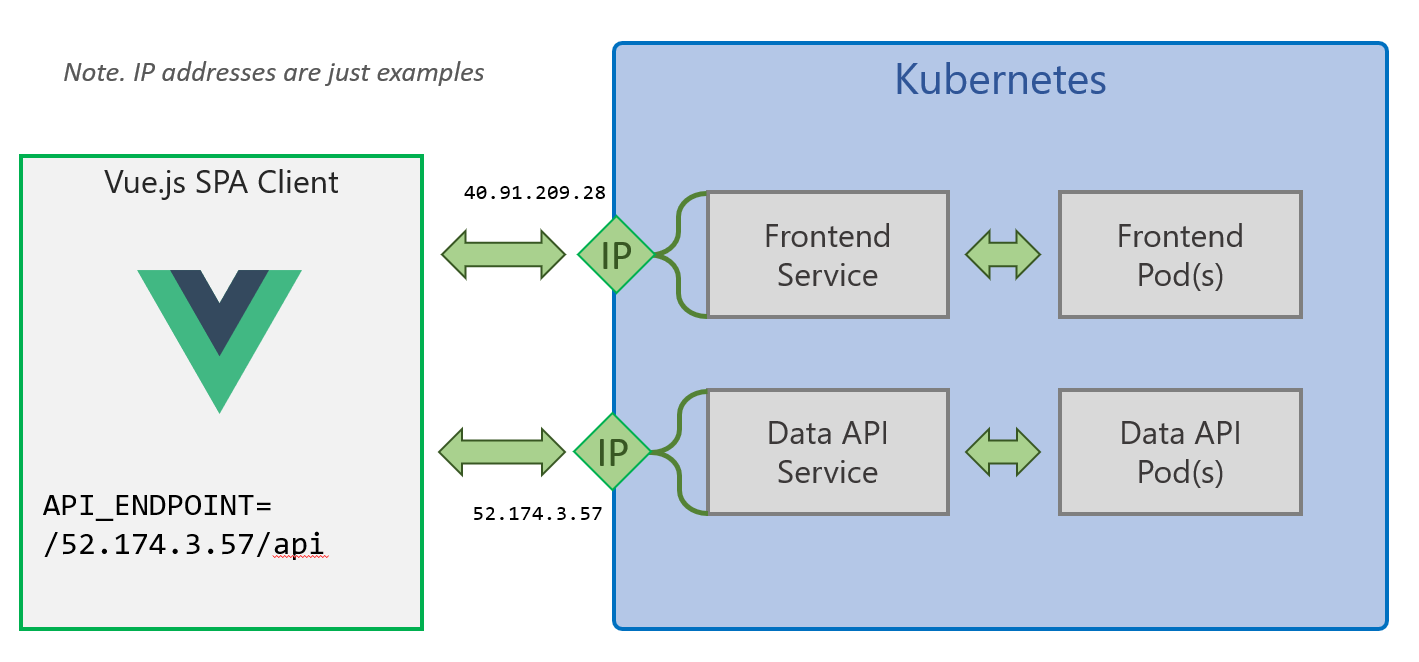
Deployment Files for this scenario are in /kubernetes/basic
This method exposes the two Smilr services externally with their own external IP addresses, using the Kubernetes LoadBalancer service type. This has the advantage of not requiring any dependency on an Ingress controller but does require some manual editing of the YAML during deployment.
Note. This scenario also doesn’t persist the data for the MongoDB
The steps for deployment are:
-
Modify
data-api.yamlandfrontend.yamland change theimage:section to point to where your Smilr images are held, i.e. your ACR instance - Deploy the data layer
 cd kubernetes/basic
 kubectl apply -f mongodb.yaml
 kubectl apply -f data-api.yaml
 kubectl get svc data-api -w
Wait for service
data-apito get an external IP address assigned, once it has, hit CTRL+C stop waiting. Note. This can take about 5-10 minutes in some cases, so be patient.
Copy the external IP address and editfrontend.yamlmodify theAPI_ENDPOINTenv URL to point to the data-api IP which was just assigned. You will need to have/apias part of the URL, e.g. http://{data-api-service-ip}/api - Deploy the frontend
 kubectl apply -f frontend.yaml
 kubectl get svc frontend -w
Wait for service
frontendto get an external IP address assigned, once it has, hit CTRL+C stop waiting.
Thefrontendservice external IP address is where you can access the Smilr app, e.g. by visiting http://{frontend-service-ip}/ in your browser
Scenario B - Advanced
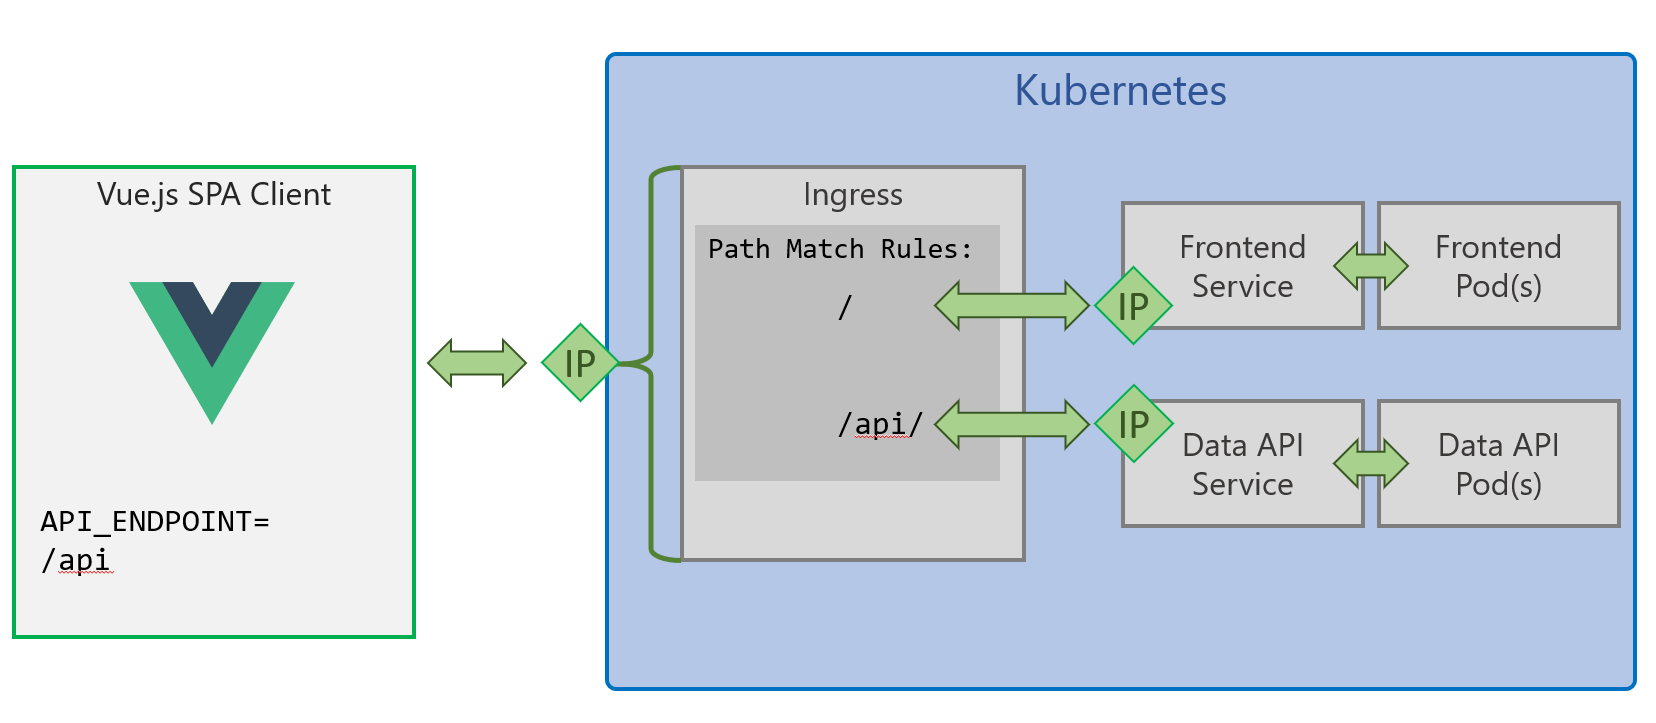
Deployment Files for this scenario are in /kubernetes/advanced
This method uses a Kubernetes Ingress to provide a single entrypoint into your cluster, and URL path rules to route traffic to the Smilr frontend and data-api as required. This simplifies config as the API endpoint is the same as where the Vue.js SPA is served from so it doesn’t require any fiddling with IP addresses or DNS.
This scenario also uses introduces persistence to MongoDB:
- Uses a StatefulSet rather than a Deployment to run the MongoDB component
- Uses a Persistent Volume mounted into the pod, to hold the MongoDB data
- This can result in a ~5 minute wait while this volume is created and bound to the MonogDB pod. Until this pod is ready the Smilr app will not be fully functional.
This scenario does require an ingress controller running in your cluster, which if you enabled “HTTP Application Routing” when creating AKS you will already have. If you don’t have this add on, use Helm (e.g. helm install stable/nginx-ingress) but you will need to change the kubernetes.io/ingress.class in ingress.yaml to nginx
The steps for deployment of this scenario are:
- Edit
ingress-http.yamloringress-https.yamland modify the DNS zone/domain to match the one created with your AKS cluster (in the MC resource group). It will take the form of{random}.{region}.aksapp.io/. You should only need to do this once - Edit
data-api.yamlandfrontend.yamland change theimage:section to point to where your Smilr images are held, i.e. your ACR instance - Run the following
 cd kubernetes/advanced
 kubectl apply -f mongodb.yaml
 kubectl apply -f data-api.yaml
 kubectl apply -f frontend.yaml
 kubectl apply -f ingress-http.yaml
Note. If you have setup cert-manager for HTTPS support (See appendix below) then use the
ingress-https.yamlfile instead - The app will be available at
http://smilr.{random}.{region}.aksapp.io/If you want to get the IP of your ingress you can runkubectl get svc -l app=addon-http-application-routing-nginx-ingress --all-namespaces -o jsonpath='{.items[0].status.loadBalancer.ingress[0].ip}{"\n"}'
Optional Appendix - Enable HTTPS with cert-manager
If you wish to use HTTPS and have certs issued via Let’s Encrypt the instuctions for setting that up are below
Enabling HTTPS with cert-manager
Optional Appendix - Enable sentiment microservice
If you wish to enable sentiment analysis of feedback comments with an additional cognitive microservice, the steps are:
- Deploy Cognitive Service to Azure (changing myResGrp and myRegion as required)
az cognitiveservices account create --kind TextAnalytics -g myResGrp -n text-analysis -l myRegion --sku F0 --yes - Create Kubernetes secret called
smilr-secretsholding the API key of the cognitive service (changing myResGrp as required)cogServiceKey=$(az cognitiveservices account keys list -n text-analysis -g myResGrp --query "key1" -o tsv) kubectl create secret generic smilr-secrets --from-literal=sentiment-key=$cogServiceKey` - Edit
sentiment.yamland change the value for the URL in theBillingenv var, so that it points to the correct region where you have deployed your Cognitive Service - Edit
data-api.yamland simply uncomment the lines for theSENTIMENT_API_ENDPOINTenv var and value. You don’t need to change the value - Deploy sentiment container and service with
kubectl apply -f sentiment.yaml - Deploy (or redeploy) the data API with
kubectl apply -f data-api.yaml